
Workflows are configured against a record type, you will see the Workflow button name under the Quick Actions panel of a Record. If there is more than one Workflow configured against a Record Type, instead of the Workflow button, you will see an Actions button which when clicked shows all available Workflow buttons.
During installation, SharePortals adds a number of workflows which are configured under: SharePortals Workflows
Power Automate Flows also behave in the above manner, though by default none are configured during installation.
Configuring a Power Automate Workflow allows you to send Record JSON information to a Power Automate Flow. This might be done for example to generate an email if a certain action occurs, send information to a 3rd party application with an existing Power Automate connector, and more.
Configure a Flow
Before you configure SharePortals, you need to first create a Microsoft Power Automate Flow.
1. Go to your Microsoft Office 365 portal e.g https://portal.office.com and in the top left app launcher, look for Power Automate
2. Within Power Automate, click Create on the left hand ribbon, Automated cloud flow, and Skip to begin creating a Flow.


3. On the Flow workflow screen, search for a trigger by typing HTTP, and select the trigger When an HTTP request is received

4. Within the section Request Body JSON Schema, copy the text from this file JSON Schema
5. Add at least one action to allow you to save the Flow. In this example a Variable action has been added to initialise a variable which will be used to build the Flow.

6. Once an action has been added your Flow can be saved. If you then expand the HTTP trigger item, it will now display an endpoint URL which you can copy for use in the next section.
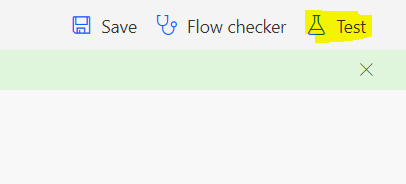
7. Click Test in the top right to set your Flow to listen for communication. On the screen which appears, select Manually, and click the Test button. At this point leave this tab open and go to SharePortals app settings. You will come back here when you initiate the flow to see the result.
Configure SharePortals for Power Automate
1. Click the New button.
2. Under Entity / Entity Sub Type, click the dropdown to select a Record Type.
3. Enter a Flow Name. This is the button which will appear within an Entity Records Quick Action panel or Actions button.
4. Enter the flow endpoint URL you copied from the steps above, and click Save.
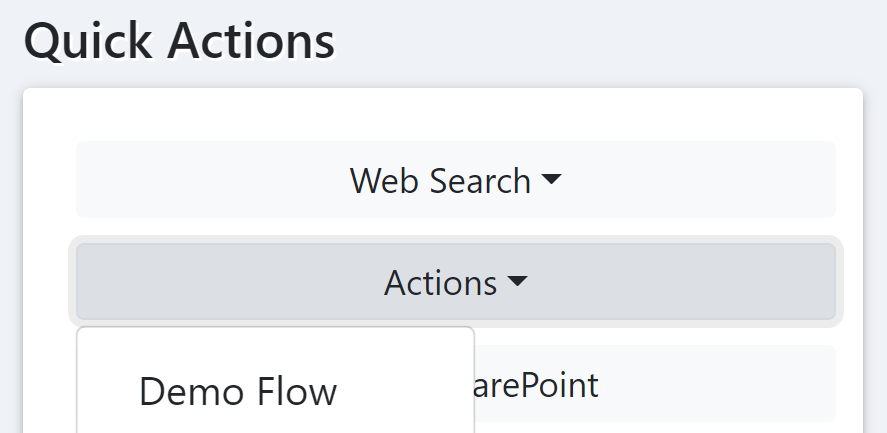
5. To test the flow, open a sample Record of the type you applied this Workflow configuration to. In this example we added a Workflow to Accounts and called it Demo Flow
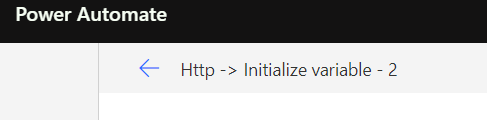
6. Switch back to your Power Automate Flow Test screen, and you should see if the Workflow button successfully initiated the workflow. In this case all we are doing is setting a variable to the ID of the Record, which in this case is 2. From here you could create a more sophisticated Workflow which utilises this Record’s contextual information for a variety of purposes, including retrieving or modifying field values for the Record by utilising SharePoint Flow connectors.
Last Modified: 2022/03/24
Post your comment on this topic.