
Although you can create a number of workflows through Power Automate, there are a number of reasons to use the SharePortals Workflow engine:
1. Power Automate connectors interact with SharePoint content directly and is not aware of the SharePortals interface. This means there can be many more workflow steps and more complexity to target and modify Field information shown in SharePortals, or create new Records. Using SharePoint connectors for workflow relevant to SharePortals would require expert knowledge of SharePoint.
2. Power Automate can’t direct user flow when interacting with the interface, for example redirecting a users screen as part of a workflow process.
3. SharePortals workflow makes it easy to update a special field on each Record called Status. This Field can only be modified through SharePortals via Workflow:

SharePortals Workflow Capabilities
With the built in Workflow engine an administrator can configure Workflows which can:
1. Change 1 or more field values in the current Record, including the Status field which is not available to edit within SharePortals.
2. Create 1 or more new Records. If there is an existing relationship set up between the Record types, this will be populated within the Record. See: Linking Between Record Types
3. Copy field information from the current Record to the newly created Records.
4. Populate static field information in the new Record.
Configuration Settings
When you first open the SharePortals Workflow screen, you will be presented with a number of existing Workflow sections which are collapsed. Clicking on a Workflow Description name will expand the configuration. There are 3 sections to creating a workflow:
1. Workflow Source
Settings related to the source record, which is where the Workflow button will appear to launch the Workflow. To generate a new Workflow Source, click New Record Type Workflow at the bottom of the screen.
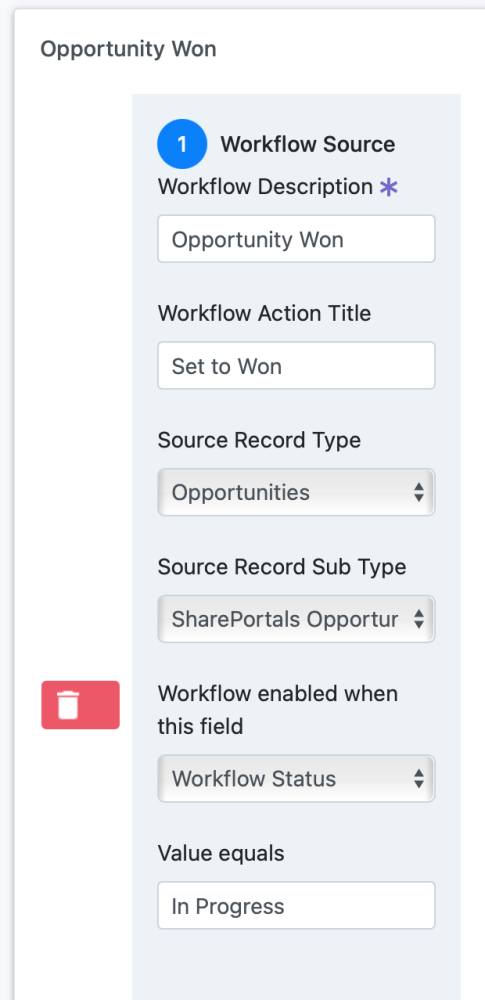
| Field | Description |
| Workflow Description | Name of the Workflow within this settings screen |
| Workflow Action Title | Name of the button which appears within the Entity Record Details screen |
| Source Record Type | The target Record Type name |
| Source Record Sub Type | The target Record Sub Type name, usually the same as above by default |
| Workflow enabled when this field | Sets the target condition Field within the Record for the workflow to be available to run |
| Value equals | Sets the value the target Field needs to be set to before the workflow can run |
2. Workflow Output
The output or destination target Record Type being affected. This could be to update the source Record, to create new Record(s), or a combination of both. To add 1 or more destination Records, click New Output Record Type.
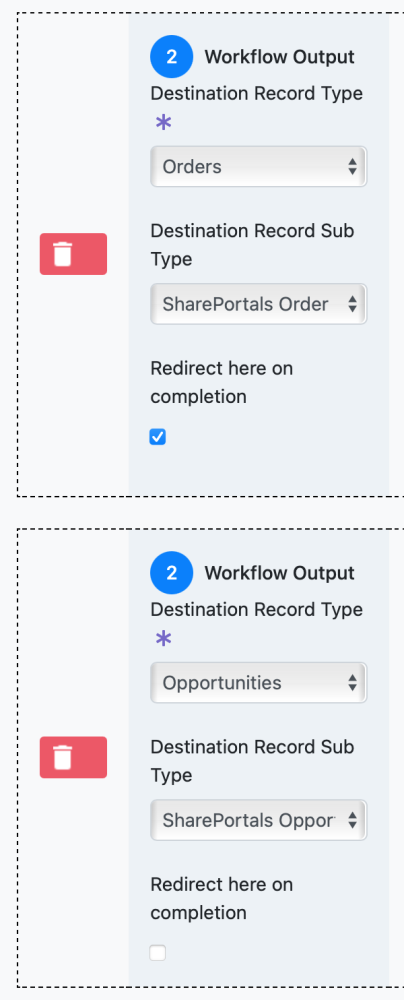
| Field | Description |
| Destination Record Type | The target Record Type we are going to either create, or if targeting the same Record Type as the source, update |
| Destination Record Sub Type | The target Record Sub Type name, usually the same as above by default |
| Redirect here upon completion | When the workflow runs, optionally redirect the user to the Workflow Output view |
3. Workflow Data
For each Workflow Output target Entity, there will be an associated 3rd stage which allows configuration of 1 or more Fields by clicking New Mapped Field for each Field. If the destination Record is the same as the source in step 2 above, then this will update the Field for the record you have open. If the destination Record is new, it will set the Field value in the newly created Record.

| Field | Description |
| Copy To Destination Field | Allows selection of a Field in the destination Record to update |
| Copy From Field | Optionally, select a Field from the source Record which will be copied to the destination Record Field |
| Use Static Field Value | If no value is selected in the Field above, type a static value to set the destination Record Field |
Last Modified: 2022/03/23
Post your comment on this topic.